1) Description
This Plugin allows management of gateways WEBSERVER AIRZONE CLOUD ETHERNET:
Web Server Airzone Cloud Ethernet
Web Server Airzone Cloud DIN Rail Ethernet
WEBSERVER AIRZONE CLOUD gateways allow you to control various parameters in each zone of your Airzone system by wifi (including the ambient temperature, the temperature setpoint, the operating mode, etc.).
Important Note: This plugin is compatible with the current versions of WEBSERVER AIRZONE CLOUD Ethernet, not Wifi. From Airzone we have been informed that throughout 2020 they will complete the development of the Wifi server with the API. When it is finished, we will publish the new links.
This plugin is compatible with current versions of WEBSERVER AIRZONE CLOUD Ethernet with firmware 3.20 (3.2.0) or higher (if you don’t have that firmware, Airzone can update it remotely).
2) Plugin configuration
IMPORTANT: This version of the plugin is compatible with Jeedom V.3.3. or higher (so Jeedom V4 also). For the configuration of the plugin, it is advisable to access Jeedom via the Google Chrome browser (latest versions).

We will access it and activate it.
After activating the plugin, you must enter the IP address and the port (3000 by default) of your Airzone gateway, in the corresponding fields, then save:

3) How to declare the different zones in Jeedom
To integrate the different zones of your Airzone system into Jeedom, go to “Plugins-> Comfort-> Airzone”:

Then click on the “+” (Add) button to declare a new zone.

eedom will then ask you to enter the name of the new zone. Note that this name will then be automatically modified by the plugin, in order to respect the name given to the area in question within the Airzone system

IMPORTANT: At this point, if Jeedom cannot connect to the IP address of the Airzone gateway that you entered in the previous step, you will get a timeout error and nothing will be displayed on the Jeedom user interface.
After clicking on “OK”, a few seconds later (the time required for the plugin to interrogate the Airzone gateway and obtain the necessary information), you will arrive on the following screen:

On this screen, you must select the object (room), check the Active and Visible boxes, then you must select one of the Airzone zones existing in your Airzone system.
As soon as you select an area, the plugin automatically fills in the fields necessary to control the area in question from Jeedom via the Airzone gateway.

4) The Airzone commands availables
When you save each new zone declared in Jeedom, the plugin automatically generates the different commands corresponding to the zone concerned. The available commands appear in the “Orders” tab:

The plugin generates 13 commands to control the Airzone gateway:
5) The Airzone widget
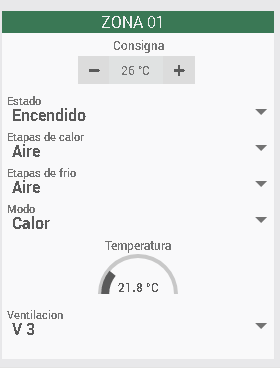
After creating the equipment corresponding to each zone (see point 2 above) and having associated it with an object in Jeedom, the plugin automatically creates a widget allowing you to control each of the zones existing in your Airzone system.

The intervals for automatically updating the various status reports on the widget are as follows:
Temperature: every 5 min.
Other values: every 15 min.
The Airzone widget is displayed differently depending on the version of Jeedom:
Jeedom v3:

Version Jeedom v4

In either case, it is possible to modify the appearance of the widget thanks to the edit mode, by clicking on the pencil at the top right.
On Jeedom v4, after enlarging the widget thanks to the edit mode, we get this by default:


